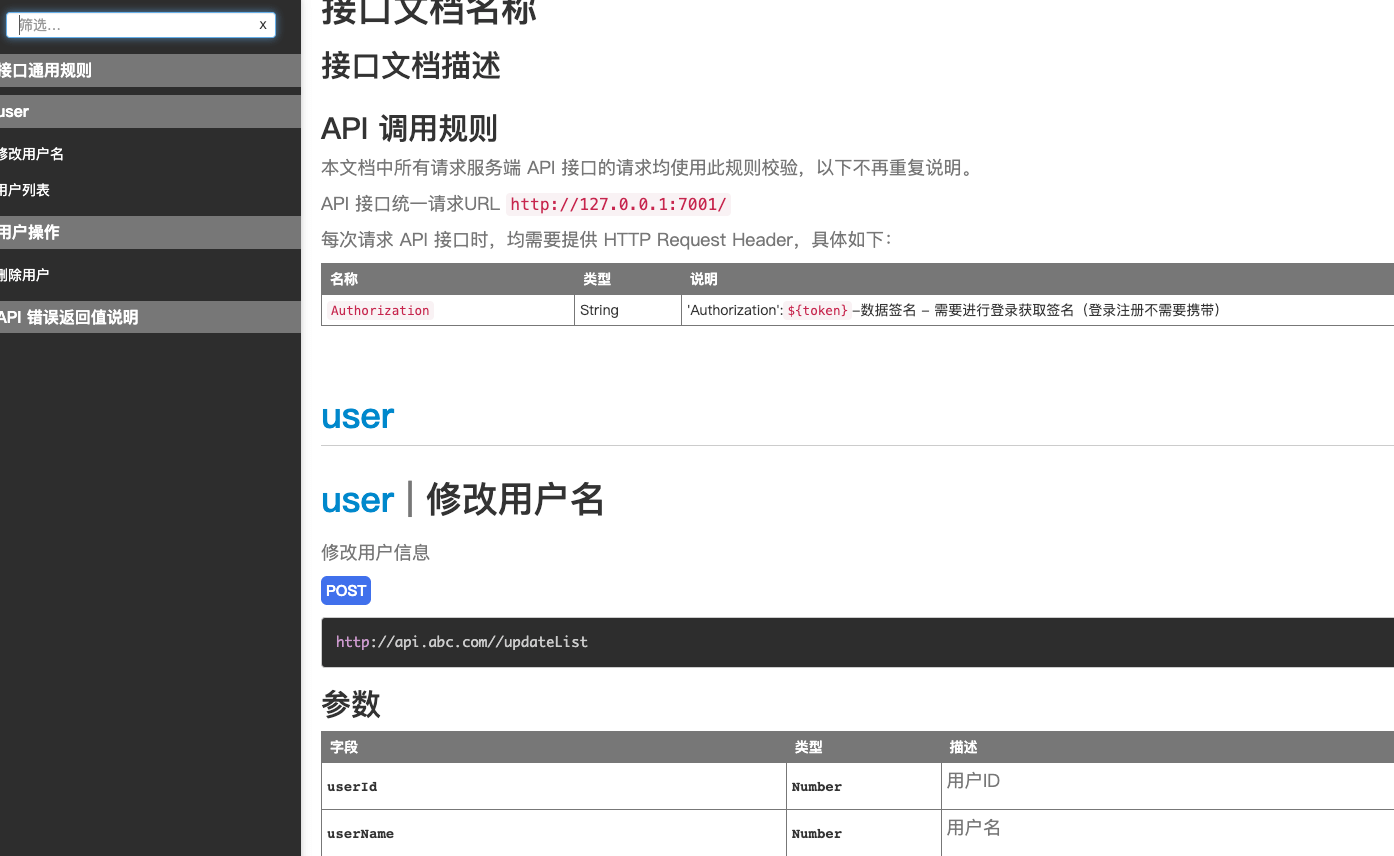
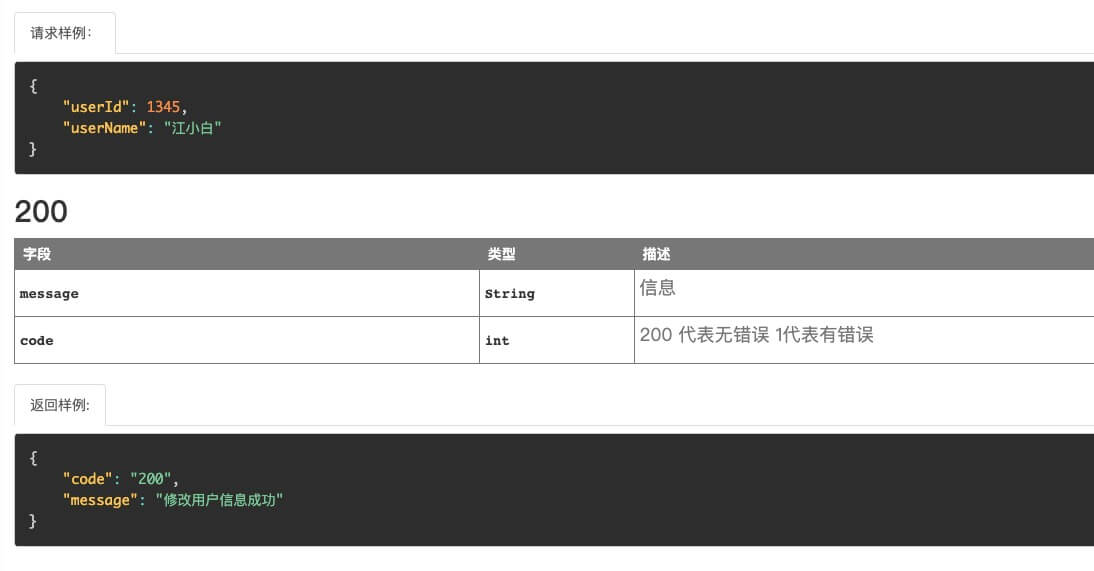
 使用ApiDoc生成接口文档
在编写完接口后,需要对接接口,这时候就需要接口文档了,不然别人对接的时候不知道你用的什么字段,每个字段分别表示什么意思。
一个好的文档,能让我们工作起来事半功倍。
这里选择 apidoc 这个插件。apidoc 官网 (opens new window)
# 1、安装 apidoc(ps: 这里全局安装,至于为啥,我也不知道,因为我在项目里安装,发现最后找不到 apidoc 命令,全局安装后却发现是可以的)
npm install apidoc -g
1
# 2、在项目根目录下编写 apidoc.json 文件,内容如下:
{
  "name": "接口文档名称",
  "version": "1.0.0",
  "description": "接口文档描述",
  "title": "接口文档浏览器标题",
  "url" : "http://api.abc.com/",
  "header": {
    "title": "接口通用规则",
    "filename": "./header.md"
  },
  "footer": {
    "title": "API 错误返回值说明",
    "filename": "./footer.md"
  }
}
1
2
3
4
5
6
7
8
9
10
11
12
13
14
15
2
3
4
5
6
7
8
9
10
11
12
13
14
15
# 3、编写接口通用规则,在根目录下编写 header.md 文件,内容如下:
### API 调用规则

本文档中所有请求服务端 API 接口的请求均使用此规则校验,以下不再重复说明。

API 接口统一请求URL ```http://127.0.0.1:7001/```

每次请求 API 接口时,均需要提供 HTTP Request Header,具体如下:
名称 | 类型 | 说明
--- | --- | ---
```Authorization```| String | 'Authorization':`${token}`-数据签名 - 需要进行登录获取签名(登录注册不需要携带)
1
2
3
4
5
6
7
8
9
10
2
3
4
5
6
7
8
9
10
# 4、编写 API 错误返回值说明,在根目录下编写 footer.md 文件,内容如下:
### API 返回值说明

#### 请求返回示例
{
 "code" : 200,
 "message" : "params missing",
 "data" : "Object [NULL | NOT NULL]"
}
#### HTTP 状态码
code | 描述 | 说明
--- | --- | ---
-1 | 错误提交 | 具体看返回的错误信息
200 | 成功提交 | 请求成功,一般用于GET与POSt请求
201 | 成功提交 | [POST/PUT/PATCH]:用户新建或修改数据成功
202 | 成功提交 | 表示一个请求已经进入后台排队(异步任务)
204 | 成功提交 | 用户删除数据成功
301 | 重定向 | 永久重定向
302 | 重定向 | 临时重定向
400 | 请求错误 | [POST/PUT/PATCH]:用户发出的请求有错误
401 | 鉴权失败 | token过期或者不正确,重新登录(账号密码错误)
403 | 访问禁止 | 访问是被禁止的
404 | 路由不存在或者资源不存在 | 访问的url不存在或者对应资源不存在
406 | 请求格式错误 | 用户请求的格式不可得(比如用户请求JSON格式,但是只有XML格式)
407 | 请求数据不存在 | 请求数据不存在
410 | 请求资源被删除 | 用户请求的资源被永久删除,且不会再得到的
500 | 服务器内部错误 | 内部服务器出错
501 | 服务器内部错误 | 服务器不支持请求的功能,无法完成请求
1
2
3
4
5
6
7
8
9
10
11
12
13
14
15
16
17
18
19
20
21
22
23
24
25
26
27
2
3
4
5
6
7
8
9
10
11
12
13
14
15
16
17
18
19
20
21
22
23
24
25
26
27
# 5、接下来就可以在控制器里入口方法前添加注释说明了,如 /app/controller/list.js 文件中:
'use strict';

const { Controller } = require('egg');

class ListController extends Controller {
	/**
	* @api {POST} /getList 用户列表
	* @apiGroup user
	* @apiVersion 0.0.1
	* @apiDescription 获取用户列表
	* @apiParam {Number} userId 用户ID
	* @apiParamExample {json} 请求样例:
	* {"userId": 1345}
	* @apiSuccess (200) {String} message 信息
	* @apiSuccess (200) {int} code 200 代表无错误 1代表有错误
	* @apiSuccess (200) {String[]} data
	* @apiSuccessExample {json} 返回样例:
	*
		{
			"code":"200",
			"message":"获取用户成功",
			"data": [
				{
					user_id: 1,          // 用户ID
					user_name: "江小白",  // 用户名
					user_tel: '1934975', // 用户手机号
					status: 1            // 状态,0未完成,1已完成
				},
				{
					user_id: 2,
					user_name: "小白",
					user_tel: '1934975',
					status: 0
				}
			]
		}
	*/
	async getList () {
		const { ctx } = this;
		const userId = ctx.request.body.userId
		const userInfo = await ctx.service.user.find(userId)
		ctx.helper.success({ctx, res: userInfo, message: '请求成功'})
    // ctx.body = userInfo
	}
	/**
	* @api {POST} /updateList 修改用户名
	* @apiGroup user
	* @apiVersion 0.0.1
	* @apiDescription 修改用户信息
	* @apiParam {Number} userId 用户ID
	* @apiParam {Number} userName 用户名
	* @apiParamExample {json} 请求样例:
	* {"userId": 1345, "userName": "江小白"}
	* @apiSuccess (200) {String} message 信息
	* @apiSuccess (200) {int} code 200 代表无错误 1代表有错误
	* @apiSuccessExample {json} 返回样例:
	* {"code":"200","message":"修改用户信息成功"}
	*/
	async updateList () {
		const { ctx } = this;
		const userId = ctx.request.body.userId
		const userName = ctx.request.body.userName
		const userInfo = await ctx.service.user.update(userId, userName)
		if (userInfo.status === 200) {
			ctx.helper.success({ctx, res: userInfo, message: '请求成功'})
		} else {
			ctx.helper.error({ctx, message: '更新数据失败'})
		}

	}
	/**
	* @api {POST} /delete 删除用户
	* @apiGroup 用户操作
	* @apiVersion 0.0.1
	* @apiDescription 删除用户
	* @apiParam {Number} userId 用户ID
	* @apiParamExample {json} 请求样例:
	* {"userId": 1345}
	* @apiSuccess (200) {String} message 信息
	* @apiSuccess (200) {int} code 200 代表无错误 1代表有错误
	* @apiSuccessExample {json} 返回样例:
	* {"code":"200","message":"删除用户成功"}
	*/
	async delete () {
		const { ctx } = this;
		const userId = ctx.request.body.userId
		const userInfo = await ctx.service.user.delete(userId)
		if (userInfo.status === 200) {
			ctx.helper.success({ctx, res: userInfo, message: '删除数据成功'})
		} else {
			ctx.helper.error({ctx, message: '删除数据失败'})
		}
    // ctx.helper.success({ctx, res: userInfo, message: '请求成功'})
	}
}

module.exports = ListController;
1
2
3
4
5
6
7
8
9
10
11
12
13
14
15
16
17
18
19
20
21
22
23
24
25
26
27
28
29
30
31
32
33
34
35
36
37
38
39
40
41
42
43
44
45
46
47
48
49
50
51
52
53
54
55
56
57
58
59
60
61
62
63
64
65
66
67
68
69
70
71
72
73
74
75
76
77
78
79
80
81
82
83
84
85
86
87
88
89
90
91
92
93
94
95
96
97
2
3
4
5
6
7
8
9
10
11
12
13
14
15
16
17
18
19
20
21
22
23
24
25
26
27
28
29
30
31
32
33
34
35
36
37
38
39
40
41
42
43
44
45
46
47
48
49
50
51
52
53
54
55
56
57
58
59
60
61
62
63
64
65
66
67
68
69
70
71
72
73
74
75
76
77
78
79
80
81
82
83
84
85
86
87
88
89
90
91
92
93
94
95
96
97
# 6、在项目根目录下运行如下命令:
apidoc -i app/ -o apidoc/
1
读取 app 目录下 controller 控制器里的注释,输出到根目录下的 apidoc 文件夹下,在该文件夹中打开 index.html 文件即可查看接口文档了。


编辑 (opens new window)
上次更新: 7/2/2024, 11:06:45 AM